Well, if you’re into pixel art like me, you will eventually want to draw some kind of landscape. Regardless of whether it’s for a game or a simple illustration, you will end up having to draw a sky, and if you’re like me, you’ll start by drawing some blue, and then…
And then nothing happens. Skies are blue, yes, but your precious and detailed piece of pixel art seems like it is now in front of a blue screen of death, and your blue looks horrid. That’s where you think you need some clouds to break the monotony, but you have no idea how to draw clouds in pixel art.
So you boot your browser and look for how to draw pixel art clouds, but at least, at the time I wrote this, there are no single comprehensive articles on how to draw pixel art clouds. I suppose this is some kind of secret each pixel artist keeps to himself, because many pieces of art have some nice clouds, yet nobody even mentions how to draw them. This is where you wish you would have done an indoors scene.
Well, fear not. I have come to tell you of one way you can use to draw credible pixel art clouds very quickly. This speed thing is quite important, because you simply can’t waste hours and hours of time just to draw a single cloud, and then when you try it on your game, it’s too big, or too fat, or simply too useless.
With this method you can draw clouds in 1-3 minutes each. This is enough to make lots of clouds, some of which you will keep and some of which you will erase without a single bit of remorse.
This method is meant to draw altocumulus and stratocumulus clouds, which are, in my opinion, the most cloud-like type of clouds. This is quite important in art, remembering the old adage:
“It doesn’t matter how real it is. What matters is how real it looks”
Me
Also, this method is meant to draw clouds illuminated from above (that would be between 10 AM and 2 PM).
You don’t have to draw your clouds like this, but you can use this as a starting point for drawing your own custom clouds with all kinds of effects for all kinds of needs. So let’s get started!
STEP 1
The first thing you want to do is choose your color palette. Most likely you already have your blue for your background, and that is going to be your first and darker color.
From there, start making lighter and less saturated colors (some hue shifting wouldn’t hurt as well), until you have 6 shades of blue. The darkest shade is your sky color, and the lightest one should be white, or really close to it.

Make some rectangles with each of these colors as I have done on the top-left corner of my picture, So you can easily access them whenever you need them.
STEP 2
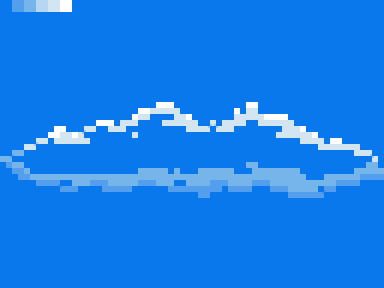
Once you choose your colors, start by picking the lightest color and draw some pixels resembling downward arcs, or the letter M if you like. These are going to be the topmost pixels in your cloud. Don’t put too much thought into these pixels, but try and make sure they’re somewhat evenly spaced, and not too thick (especially at the borders).

As you can see, I’ve drawn some two groups of pixels, one on the left and one on the right, each one roughly going up and then down again. I know, you need a lot of imagination to visualize this >_<;;; These are the highlights of your clouds.
STEP 3
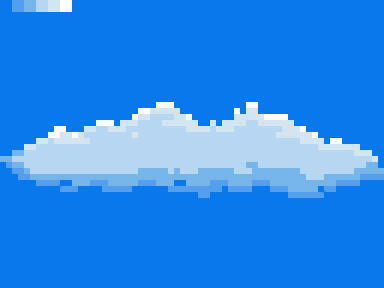
Now with the next shade of blue draw some pixels below and to the sides of the pixels you’ve already drawn. Think of this as building a base for the pixels you’ve already drawn. Once again, don’t put too much thought into what you’re drawing.

STEP 4
Now with the darkest shade of blue that is not the background shade, draw the bottom of the cloud. This should be drawn a little bit more straight, but as with the first pixels, they should somewhat resemble an upside pointing arc. Once again, don’t stress the precision of the pixels you’re drawing, as clouds are all about randomness.

This is the bottom base of your cloud, and the rest of the cloud will go in between these two slices.
STEP 5
Now, with the next lighter shade of blue, do the same as you did on step 3, only that above the pixels you’ve just drawn. On the next step we’re going to do a floodfill so also try and adjust the pixels in your image so the interior of the cloud will get properly filled without bleeding to the rest of the sky.
STEP 6
Now with the only remaining shade of blue, floodfill the interior of the cloud. This is quite straightforward, but now you can see most of how the cloud will be like.
STEP 7
Now it’s time for details. Fix any pixels that don’t look very good, and add some other pixels where they need to be added. You should polish your work, but once more, don’t dedicate too much time to this. Before you finish, don’t forget to remove your palette.
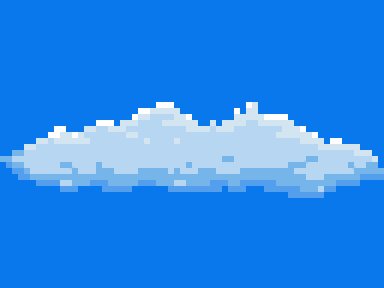
FINISHED!
There, now you have a bunch of pixels that look like a cloud. Now make lots of them and now you have your sky!